Saturday, April 30, 2011

Tiffany's Garden: Transplants!!

Remember these guys from my seedlings post??


Look at them now!!


All grown up and on their own in the big world!


I'm so proud of them and myself I could cry! This was my first time trying to start a garden from seeds, and I really didn't think I could do it. I can barely keep my poor houseplants alive! 

I'm not sure if they'll all make it. My poor green beans aren't looking too happy :(   But, honestly, the whole experience is already one of the most satisfying things I've ever done! And to think they I might actually get to eat something they produce some day..SO amazing! 


And check out this amazing drip irrigation system, my wonderful husband's idea! No more dragging the hose around everyday. It's set up to automatically water my garden!

I had never even heard of it and didn't think I could have something so fancy. My husband showed me how to set it up, and it was so easy, anyone can do it with the right supplies.  I'm putting together a step-by-step tutorial to post soon.

I'll keep you updated throughout the Summer on how my plant-babies are doing. Hopefully I'll have some actual veggies to show you soon! I'll also be sharing any recipes I use them in, and maybe even some canning tips and recipes, if I get really ambitious.

Wednesday, April 27, 2011

Dining Room Inspiration

So we sold our dining room set recently (ok, it's been a few months now..), so I get to start from scratch re-decorating! Sounds like a dream...but it's a little daunting starting with a completely clean slate.

I realized I wasn't even sure of my dining room style. So I scoured some of my favorite sites like decorpad.com, southern living, and potterybarn, and cut and paste pictures I was drawn to into a Word document.

And I was really surprised by what I discovered! I really L.O.V.E. informal dining rooms. The cozy, inviting, beach-cottage-in-the-countryside-in-the-mountains-off-a-garden look. ..as I like to call it :)

Can you imagine sitting down for breakfast here every morning? And then wandering in that garden for the day? This room is going on my wish list for heaven!

I love mismatched sets that looks like you gathered some pieces you love and threw them together. I realized I want a room people want to hang out it in and feel happy and comfortable and at home.  Not a stuffy room only used once or twice a year..and looks like it.


I like the softer colors and even the wicker here. Who would have thought! I really love this ceiling! I'm thinking of doing something like that in our kitchen down the road.

I need a new chandelier too. I'm not sure yet of my style. I'm kinding of torn between the pendant light above..
..a slightly more formal look with the little "hat" shades.

..and I like the lantern look too. Hmm. One thing at a time. I need to decide on a table set first.

This room is from the movie "Something's Gotta Give". Have you seen it?? If not, you MUST. Not because it's a great movie..it's just okay..but it's one of those movies you must see for the house! Every square inch is my dream home. Ahh...

Anyways, I'm really loving the idea of an oval, pedastal table too. I like the idea of squeezing everyone around it. Seems cozy and a better use of space. And not something I would have ever thought to do before.

I'm also loving the natural fiber rug. And I was surprised that I was really drawn to rustic, antiqued white tables. I saw this table in the pottery barn store and was in love. I wanted to bring it home like a lost (expensive!) puppy. I almost cried having to leave it behind.


Okay... so here's the problem. I ran this informal room concept past my husband and he hated it. He has in his head that dining rooms should be formal. I did too until recently, so can't blame him. Although, he'll also admit he has no sense of style and loves and trusts my decorating decisions. I want to respect his input and not come up with a room he hates. And, the more I thought about it, I still want a dining room formal enough that people don't feel silly eating a fancy holiday meal, all dressed up, in the room.

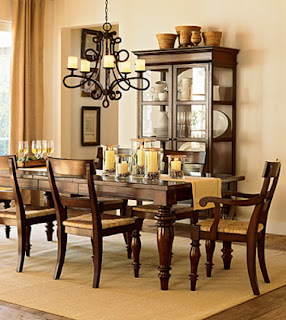
So what about this style for a compromise...

Dark wood, fancy table legs, color of chairs match the table..which says traditional and formal to me, to make my husband happy. But I like the more informal look of the chairs. I'm also thinking of doing a different style end chair, for my mismatched look. And I like the tie-on chair cusions. I could do them in an informal pattern, like stripes. Kind of like the idea of mixing things up with a formal chandelier too, like the picture above.

Does this style look inviting?? Like you would be happy hanging out for a cup of tea or sitting down to a nice holiday dinner??

I want to get something I really love that is good quality. But I also don't want to, and can't, spend pottery barn kind of money.

So I found these at jcpenney.com. Isn't usually the first place I check for furniture, but I was desperate and had searched everywhere else first. They actually have some pretty nice stuff for great prices!
Catalina Pair of Side Chairs
..for $145..for BOTH!
You can't even get half a pottery barn chair for that price!
Savannah TableRaleigh Table
And these tables, from jcpenney too.
The one on the left is $299, and I like it better, but it doesn't exend. The one on the right is $399, but can be extended. Hmm.. still looking around for a pedastal table I love for the right price.

So this is what I'm leaning towards right now. Might all change tomorrow, but I really need to just make a decision soon. I will let you know what I decide and share my decorating progress as I go!

I'd love to hear any input or suggestions!

Monday, April 25, 2011

Orgain


I'm usually a little afraid to try "healthy" pre-made protein drinks or other health drinks. But Mom bought me one of these to try so I figured I'd give it a shot. I mean, with all the healthy stuff that is packed into the 11oz. container, I figured I could at least force it down to get some nutrients into my body. I took one sip and couldn't believe how good it was! I keep a few of these in our fridge for mornings when we are running late and don't have time to make breakfast or when I know it's going to be awhile before my next meal. I know they are a little pricey, but the convenience of just being able to grab it on the run, and all the healthy stuff packed in to it is worth it for me every once and awhile. You can find them at stores like Whole Foods.

Visit: http://www.drinkorgain.com to learn more about it and to watch a video.

Monday, April 18, 2011

DIY: Growing Wheatgrass

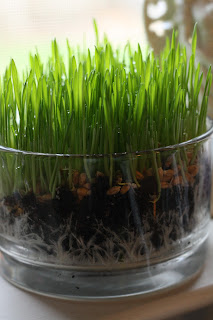
How Beautiful is this???

I'm officially obsessed with growing wheatgrass now!

It was the strangest thing...my husband asked one day, out of the blue, if we could start adding wheatgrass to our smoothies...I didn't even know he knew what wheatgrass was...and then it seemed like there were a million blog posts on how easy and fast it is to grow at home.

I've been trying to add more live plants around the house, plus, I just looooved the way it looks for Spring and as an Easter decoration.

And it's the easiest thing in the world. A nice break from working on my garden seedlings.

The toughest part might be finding the seeds if you don't have a natural food store nearby. You can also shop around to buy them online though. They probably won't be called wheatgrass seeds...usually it's wheat grain or wheatberries. These were called Hard Red Wheatberries...and they were about $1/POUND. I got a small bag for a dollar (so must have been around a pound), planted a ton, and still have a LOT left.

All you need is some dirt..any dirt will do. You don't need much. You can even grow these on wet paper towels!

And any container will do. I especially love the glass containers so you can see the roots!


I saw a number of ways of planting them...it seems like they will grow no matter what you do as long as you keep them damp. I just kept a spray bottle of water nearby and sprayed whenever I thought of it.

Some people soaked them in water overnight first..I don't have that kind of patience. Some people put a layer of dirt on top, which would probably help to keep them damp. But I loved the idea of just throwing seeds on top of the dirt like this!

And this is what I have 6 days later!! (great planting project for those short on patience like me!)

Does this just take your breath away like mine??

It was like watching a miracle unfold right before my eyes. Even my husband got excited about it and would come home from work and ask how they were doing :)

They grow really fast, so you have to keep trimming them. I think we might actually add some to our smoothies. The rest I'm going to set around the house to add a bit of life to each room!


Saturday, April 16, 2011

Spring Purge: The Mass Exodus

I wanted to update how my Spring Purge is going. It's been a slow but steady process, which is great because that approach has kept me from stressing about getting everything done at once...which usually leads to me becoming overwhelmed and giving up.

After clearing out my master bedroom closet, I put everything into bags and tucked them away in a massive pile in the guest bedroom...where they sat for weeks! 

That was totally counterproductive to clearing things out. I had just created a bigger mess to tackle. And I was too overwhelmed to deal with it. It was just too much stuff to shuffle to the basement or to load up my car and drop it off at a donation center. Not to mention I was starting to get a little anxious and cold feet about giving so much stuff away, even though it was abundantly clear I wasn't using any of it. It was so easy to pick outfits and my closet was so easy to keep clean now!

Then I got a card in the mail saying a charity, Big Brothers Big Sisters, was going to be coming to the house to collect donations! Perfect! Next time I will call to schedule a charity pickup first, or at least have a plan to get the stuff out of the house, and then use that as a deadline and motivation for clearning out. It's so much easier to justify getting rid of things to when you know it's going to a good cause. Other people actually need these things. I just wanted them. Lesson learned.

And the pickup was for both clothes and housewares. That reminded me, when we moved into this house, I did a great job of sorting through the things we no longer needed...and then they sat piled in boxes in the basement for over a year. I think I used the excuse we were collecting things for a garage sale or something. That never happened and probably never would. Time for it all to go!

The charity certainly hit the jackpot at my house!

I kept adding more throughout the day until the front door was completely blocked!

That's just the clothes and shoes I got rid of! Isn't that disgusting? Disgusting that I had accumulated so much stuff I didn't need. Stuff that I didn't need but was still floating around my home...stuff that was taking up valuable space...and stuff that was eating up my time to deal with on a daily basis!

And there was more inside I couldn't fit on the front step! Books, old curtains and curtain rods, old picture frames and rugs, cooking items and bedding. I kept adding to this pile throughout the day too.

My husband told me I needed to keep track of what I was donating for tax purposes, but I had no idea how. I found this great resource, itsdeductible.com.   It creates a list and assigns values to all the items you donate for tax deductions. The lists of things were so extensive that it gave me ideas of more random things to donate, like a wall hanging from my first apartment and some pieces from my extensive collection of vases from all the beautiful flowers my husband has sent me through the years :)

The experience made me realize...I love clearing out my home BUT I hate getting rid of stuff.

 I look at all these things we spent our hard earned money on. Things I thought we needed and that would somehow improve our lives. Gifts that we had given each other or that had been thoughtfully given to us.  It really hurts to get rid of things. Things we could use "someday" but never do. But, at some point, you just have to step back and tell yourself that your peace of mind and time are worth more than all the stuff. I'm just glad I finally reached that point because my life is so much better now without it all!

And because it was so hard to get rid of so many things...now I'm more careful about what the new things I bring back into my home!


Thursday, April 14, 2011

DIY: Framed Corkboard Message Center

I wanted to share this cute, quick, easy, functional little organizational project. I was sick of having papers all over the kitchen and only having a calendar of events in my head.  

I've had this picture from my first apartment sitting around. I don't really care for the picture, but always really liked the frame. 


So I just popped the picture out to use the frame. I used the picture as a template to cut out a piece of corkboard to fit.

I've also had my husband's old full-sized corkboard hanging out in my basement storage area. I like the idea of it, but to just put it up as is felt a little too "college-dorm-room/bachelor pad" to me (yes, I am a corkboard snob now). It was a little tougher to cut the corkboard than I was expecting. I had to use a combination of scissors and different sharp knives to cut out the board.

You could use any frame you have around for this project, and they sell just corkboard at any craft store or even walmart and target if you don't have a spare corkboard.


... And this is what I ended up with!  I love it and feel so much more organized now. The corkboard is great for things like invitations, grocery lists, and other important pieces of paper, that used to float around the kitchen. I just attached a calendar I had around to the back. I'd like to eventually make something for the calendar too, but not sure what yet. And I may also spray paint the frame and board, but I'm happy like this for now.


Wednesday, April 13, 2011

Goodbye Vertical Blinds!

I HATE vertical blinds more than almost anything. Brian's giant recliner in the family room is a close second, but at least it's comfortable...yellow-orange wood furniture and regular blinds round off my list...oh, and the white linoleum in our master bedroom...but, I digress...


I died a little inside waking up to this every morning in my otherwise beautiful home... so ugly, so cold, so impractical, falling apart every time I tried to open or close them...


Brian hated them too, but thought I was crazy when I mentioned we switch them for the curtains in the dining room. But, being the most wonderful and handy husband in the world, he indulged me and put them up when I explained how I was going to lose it if I had to look at them for one more day!


Sooooooooooooo much better!!
Look out! You're next to go, orange bottom-of-the-line cabinets! I read this post on painting cabinets and am inspired!

Monday, April 11, 2011

DIY: Felt Flowers

As promised, here is the tutorial for the felt flowers from my Spring Wreath post. It's the easiest, most satisfying craft ever. The time I made one I was so excited, I was like a crazy person.. sitting on the floor, surrounding by a sea of felt scraps, just pumping out one felt flower after another.

I picked up this felt from Michael's for like $0.30/sheet. You can also get it in bulk at a fabric store, but I wanted the different color options and didn't feel like driving all over town to find the cheapest felt in the area.

You'll also need scissors and a glue gun (if you don't have one, you can use this as a great opportunity to go out and get one..it was an empowering purchase, I feel like a real crafter now! I just got the cheapest one I could find and it's perfect).
Start by cutting it into a square (I've done rectangles too, to try and get a slightly different shape).  You don't need to measure at all. Then cut off the corners, for a weird oval-like shape.

Then start cutting a swirl-y from the outside towards the center.

Starting with the outside end, start rolling the felt. Sometimes I glue gun it as I go, sometimes I don't. It all kind of gets glued together in the next step, so I don't think it matters too much.

Once you get to the end, you'll see that the very center of the circle is going to fit perfectly over the bottom and help hold everything together once glued. Some people like to use this side as the top..I prefer the other side. Whatever floats your boat.

I love any opportunity to use my glue gun! Just go to town with it!

And there you have it! 

You can get creative too, once you have the basic flower down. I like the look of making wavy cuts along the swirl (like the big, tan rose on my Spring wreath). I made the starburst flowers here by taking a long strip of felt, making little cuts at the fold (don't go all the way through), and then rolling the strip up like the roses. I can do a tutorial on those too, I'm not sure I explained that very well.

Felt flowers on my Valentine's day wreath.  

There you have...you will now be addicted to making felt flowers too. My apologies.

Saturday, April 9, 2011

DIY Hair Bow Resources

pinwheel bow 1

I've been thinking about making hair bows for my baby girl since before she was born. I don't really go crazy dressing her up, but putting on a bow for special outings is just too precious!


They look so simple, but I've been intimidated to try. It stinks being a perfectionist. It's hard for me to try new things because I usually just assume they won't live up to my expectations.

I thought I would at least start my bow making adventures by finding some good resources. I hit the jackpot and wanted to share some links. Even if you don't have a baby girl, these bows would make awesome baby shower gifts or "just because" gifts for a certain special, precious little niece :)

GirlyThingsBows.com - Tutorials on tons of different bows and more, like how to line alligator clips
Beginniner's Bow Guide - Huge list of great links here at MakeBowsAndMore.
Great Step-by-Step instructions on how to make a Pinwheel Bow at  hair-hardware.com.

I've also found some good sources for buying supplies in "bulk". Not planning on going into mass production, but I figure there's gotta be cheaper options than the local craft stores.

ribbonandbowsohmy
theribbonretreat.com
unitedbeadsus.com
hairparts.com

There are also a lot of YouTube videos on how to make all the different styles of bows. I find it really helpful to be able to see all the steps, like How to Make a Twisted Bow.

I also came across whole blogs dedicated to little girl hairstyles! There really is a blog for everything. I'm excited because one weird irrational "Mom Worry" I've had is 'how am I going to style my daughter's hair someday when I can barely manage a decent ponytail for myself??" Now I at least have some good sources!

http://www.babesinhairland.com/
http://cute2tryhairdos.blogspot.com/
http://www.girlydohairstyles.com/

I'm thinking of getting some of my Mommy friends together for a hair bow making party soon. I'm hoping by posting this I'll be motivated to follow through and share some finished projects. I will be sure to share.

Friday, April 8, 2011

Homemade Spring Wreath

I'm a big wreath fan now and want to have one for every season. It just makes the front door and house look so welcoming.

I'm so in love with the wreath I made for Spring/Easter and had to share!!


I love grape vine wreaths. They are so inexpensive at any craft store. This one was around $4.00 at Michael's. Use the 40% coupons to get them for next to nothing. Sure beats the $30+ premade ones!

I may add some ribbon or something to jazz it up a bit still, but I'm perfectly happy with it as is.

And yes, I made all the felt flowers myself!! I'm obsessed with felt lately.  I'm planning on making some gorgeous hair bands for my daughter with some more of these flowers. It's the easiest craft in the world.

I'll do a post on how to make them in the next few days. Just have to get the pics off my camera first. No small task considering I've been home alone all week with a 9 month old into everything while Daddy was on a training trip. I also have some more Spring/Easter decorations to share. Some of the cutest ones from the Dollar Store!

Wednesday, April 6, 2011

Tiffany' Garden: Seedlings

I've really loved having a vegetable garden the past few years. Nothing fancy, mostly tomatoes, peppers, giant squash,  an eggplant and such. I didn't even like tomatoes until I tasted one fresh picked from the garden. You realize how gross and flavorless everything is from the grocery store.

The past few years I've bought plants from the nursery, Lowe's, Home Depot, or Walmart...and they worked out fine. But I've always looked longingly at all the beautiful displays of seeds. Considering my track record with killing countless poor, potted plants, I didn't think I could pull it off.

 I realized that I was letting my fears hold me back from doing something potentially very enjoyable and fulfilling. And fears of what...spending a few dollars on seeds, not getting any to grow, then going out and buying some plants like I usually do anyways??

So I bit the bullet and went for it!

I may have gone a little overboard..I got a little seed-happy considering they are only $0.20 to $1.00 each.  I got them all over the place...Home Depot, Walmart, and a local Garden Center. Walmart had a lot of choices for $0.20, so might be a good place to start.


And...I've got seedlings now!!!

I got a few seed trays at Home Depot. Best place I found for them.. Walmart and the garden center didn't have the ones I wanted, the kind I can use again next year. Although I was there again a week ago and things were already picked over.

I'm trying all kinds of goodies..3 kinds of tomatoes, couple of peppers, eggplant, squash, cucumbers, beans, peas, broccoli. I'm also trying to get some herbs going from seeds: basil, rosemary, tarragon, dill, cilantro, chives. So far everything has sprouted except some lavender. The broccoli is kind of toppled over and not looking so great. I'm also looking to get a raspberry, blueberry, and strawberry plant.

You can see in this picture how all my little guys bend towards the sun. Isn't that so amazing??
I rotate them everyday to try and keep them straight.

I got these "Jiffy Pots" at the garden center. You can plant them directly in the garden. Not reusable, but fairly cheap..$0.10 for the small ones, not much more for the big ones.


Once I saw how good my veggies were doing, I decided to get even crazier and start some Annual flowers from seeds (the pretty kinds you plant every year) and some Perennials (the kind that come back each year). Perennials are usually $5-7 each, so I figure even if I can get one going, it would more than pay for the seeds.
It's hard to see, but I've got little seedlings already. I'll let you know how it works out and if I get anything I can actually use.

You can see I'm putting my scientist skills to good use, keeping a gardening notebook. I've got maps of my planters and notes like when the plants were started and some of the info from the seed packets like how long until harvest, how big the plants are supposed to get, etc. I'm hoping to keep it up so next year I know what works or not.

So you can see, we don't have very a very high-tech operation going on over here. A card table and dog crate. I don't even have seed lights. Maybe next year.

Side note..this is my poor dining room/green house right now. A good "Before" picture. We sold our table set to friends and repainted. I'm still trying to figure out what I want to do in there. It's kind of fun being able to start from scratch, but also a little intimidating. I'll be sharing some ideas and the progress I make.


My husband got excited about the garden, so he offered to build me a "raised bed". And boy did I get one! He wanted to make sure it was high enough so the dog doesn't go tearing through (which he totally would).  This should keep him out! :) I love it though.

Even if I get one that I can get one plant to the garden and get one veggie from it, I would consider the work and experience more than worth it. I'll share my garden progress through the season and what I'm learning along the way. I'm planning on trying my hand at canning this year too...maybe try some spaghetti sauce, salsa, or pickles. Keep your fingers crossed that I actually get some things to grow!!