I did it!! I crafted!!
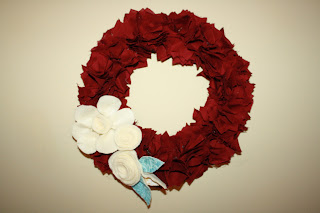
Check out this beautiful wreath I made for Valentine's Day!
Yeah..I made that!
I was inspired by the Valentine's Day wreaths in this post from MoneySavingMom.com. I loved the look and was surprised by how easy they looked to make.
Inspired by those and this...
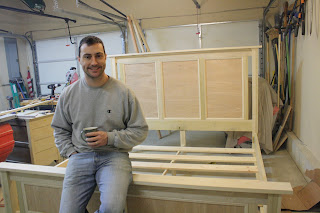
Yeah...that's our new bed that my husband built completely from scratch, using techniques he completely taught himself. He even made the decorative wood trim pieces!! Granted...he is some sort of super-human that does things no normal person does...BUT, it made me realize that if he can teach himself to do that, and actually do it..in 2 weekends, no less...then I have no excuse to not at least try one of the crafts I sit around talking about wanting to do and dream about doing, but never follow through and actually do it.
So I busted out some crafting things I had sitting in a box in my basement. The kind of things you pick up on a trip to Michael's while you daydream about being crafty and think, 'hmm..I could use this for something, someday'..then pack away in a box in your basement storage area for a year (ok..2+ years).
I pulled out this woven circle thing I had bought for $1 to make a Fall wreath and never followed through, my glue gun that I've used once or twice, and this piece of red fabric remnant I picked up at JoAnn's with plans for a sewing project someday.
First, you need some sort of a base. Really, anything would work as a base, since it gets completely covered. You could even cut out a piece of cardboard. A heart shape would be really cute for valentine's day.
Get some fabric and cut up into a ton of squares. No need to measure at all or make them perfect. If you buy some, about 1/2 yard of the cheapest fabric you can find would work fine. Any type of fabric you have around would work. Even coffee filters and cupcake liners work!
This gives you some sense of the scale. I cut mine around 2 x 2 inches-ish. You can see that clearly they weren't perfect. I tried to put the bigger ones in the middle and smaller squares on the sides
So, you just fold each in half..
And then fold in half again...
Add a dab of glue on the ends
And stick on the wreath. That's it! Now repeat about a 100+ more times.
Keep filling in until you can't see the base anymore. It took me between 1-2 hours to do in between taking care of my little rugrat.
Warning....I wouldn't recommend doing this on the floor near a very curious 7 month old. My newly crawling daughter made a beeline from across the room for the small pieces of fabric!
And there you have it...a very cute Valentine's Day wreath for less than $5. I loove how it turned out!
I made the felt roses to stick on there too. I'll have to do another tutorial on those..I'm addicted to making felt flowers now!
I didn't really plan it, but I love that the red fabric is the exact color of red roses. The woven wood base I used made a perfect hook for a picture hanger. You could also add a strip of fabric to hang from.
It makes me smile every time I see it! I foresee lots of these wreaths in my future for the rest of the holidays...a burlap one for the Fall, a silky, sparkly, or all white one for Christmas. I'm in love!


2 comments:
aww. Yeah T! You did it! And you had the guts to post the picture of your little wreath next to Brian's furniture he made with his own two hands ;) Takes real guts... Yes blah blah blah Brian made his own furniture we are all very proud of him! Just kidding, it is very impressive!
But enough about Brian's work, lets talk about your masterpiece! It really is super cute! What a great craft idea. And so easy and doable! I'm proud of you, Tiff!
Ok... I suppose this is something I can manage. I am SO un-crafty. But I know I would feel so accomplished if I was able to create something like this. Who knows... maybe I'll even awaken some inner artist/designer in me! How did you make the white flowers??? Great job, T! It's very cute!
Post a Comment