Saturday, December 17, 2011

Perfect Saturday

I would love to share with you my day of Bliss.

It all started by sleeping-in after the most restful night of sleep...ahh...

Then we packed up our breakfast sandwiches, coffee, and dog and headed to the park. There are few things in the world that give me more joy then watching our dog run free at the dog park, playing with all his newest bestest friends, splashing in the pond, and frolicking around with a big goofy smile on his face! Pure exuberance!


It is always such a fun way to start our Saturday mornings! And it is so enjoyable talking to the other dog owners. Dog people are always such nice friendly people.

Then we headed downtown to the Farmers Market. Farmers Markets might be my favorite things ever. It will always be a good day if I get to go to a farmers market! I got so much of my last minute Christmas shopping done. I was VERY happy about that.

And what made it even more enjoyable was that my husband was being such a good sport about it all and even seemed to be enjoying himself!

After we were done at the Farmers Market, we dropped the dog off at home and went to lunch at one of my favorite places. Always such a treat! Then I came home, ate like 10 Christmas cookies, and took a nap next to the Christmas tree. PURE bliss.

I woke up in time to see the most beautiful sunset out the window. I just had to get outside and soak in the last bit of this perfect weather. So we took a little stroll around the block in the crisp, refreshing air as the sun set and the Christmas lights started to come on. Just perfection.

I think I will end this perfect Saturday with a Christmas movie and a cup of hot tea... Life is good!

Wednesday, December 14, 2011

Easy Homemade Christmas Gift


Okay, So I'm just a little bit way too excited about this.. I made these homemade gifts in a jar for my Christmas girls night tomorrow. I got the idea here. (Thanks so much, Tiff!). I made the peppermint body scrub. SO easy! Makes me feel really silly for ever buying expensive body scrubs in fancy schmancy stores.


I am going to call mine "candy cane body scrub". I found the jars at Wal-mart for $2 a piece. I considered the jars part of the gift because I'm sure they will be able to re-use them.

For each jar I did...

1 cup sugar
1/2 cup grape seed oil
20 drops peppermint oil
4 drops eucalyptus

They smelled sooooo good! Can't wait to see the girls reactions!

Monday, December 12, 2011

Me Day


I really think a "Me Day" is in order! I'm starting to get a little bit of that Christmas panic feeling. I have so much to do, so many Christmas presents to buy, I haven't finished decorating, I haven't made one cookie yet, and every day is getting closer and closer to Christmas! I'm running out of time!! AHHHHH!!!!!

I certainly don't want to feel this way. Especially this time of year. So I think the most important thing to do right now is have a day where I get caught up on the very basics.

It is a cozy, rainy morning out right now. I am going to have a nice relaxing morning in front of my Christmas tree (please don't take any notice that the tree is a little crooked). Then I am going to finish decorating and get the house all cleaned up! Nothing makes me feel more like I have my life in order then a clean house.

So that is my goal for the day. I am giving myself ONE goal. I am not going to overwhelm myself by trying to get everything done in one day. I am not even going to worry about all the presents I have to buy right now. I am going to sit and make a shopping plan and do all my shopping another day. (There is something about getting thoughts on a piece of paper that really helps to de-clutter my brain!)

Tonight, once my house is perfectly clean, I think I'll make some cookies and watch a Christmas movie!

Thursday, December 1, 2011

Homemade Gifts in a Jar Ideas

For some reason, I had been feeling really inspired to make some homemade gifts in a jar for friends this year. I didn't really know what to put in the jar...just think anything in a jar makes a cute present. I was even more inspired when the stars aligned and I found a case of 12 jars on clearance at Target for $2.50!

I'm hosting a Christmas brunch for friends next week and think it would be so cute to send everyone home with a little jar gift.

So I went a search for inspiration.

Here is a free ebook from Heavenly Homemakers just on gifts in a jar ideas.


I liked the idea of Rosemary Focaccia Bread mix in a jar, or the layered bath salts mix.


Organized Christmas has more great ideas here,

white chocolate macadamia cookies in a jar
Like these White Chocolate Chip Macadamia cookie mix in a jar. My favorite! But perhaps not Christmas-y enough?


Or like any of these great ideas at my blessed life, like Peppermint Cocoa!


So what do you guys think? Is this a silly gift idea? What gifts would you be happy to receive in a jar?

Tuesday, November 29, 2011

Re-Growing Green Onions!

This is one of those simple things that just blew my mind....


I saw this tip on MoneySavingMom that you can re-grow store bought green onions, and just keep snipping the tops as you need them.

Did I just blow your mind too??

More details here.

Monday, November 21, 2011

Free Personalized Birthday Card


I'm not sure if it's because I'm in the midst of Christmas shopping or what, but I'm still feeling compelled to pass along more of my favorite deals :)

I just saw over at Moneysavingmom an offer for a free birthday card from TinyPrints.com. Use code FREEBD at checkout. Not sure when it expires.

Shipping is free if mailed directly to you, or the price of a stamp if mailed directly to the recipient. You can select the day you want it to arrive.

It's really nice having a card sent out automatically. I always seem to remember birthdays way in advance, have the card all ready to go, and then forget about it and end up sending it out late.

I've gotten a number of free cards from them over the past year and they are sooo nice and the personalization is a BIG hit with everyone I've sent them too. It's like a little gift itself.

Off to make my free card! I know cards are only a few bucks, but getting free ones makes me absolutely giddy!! :)

Baking Day Plan: Butterhorns,"Snow Balls", and Carrot Cake Cookies

mise en place before baking homemade cookies


For the year before I was pregnant, I was baking pretty much everything from scratch...bread, bagels, rolls, pizza dough, English muffins, soft pretzels, pita bread, muffins, granola, granola bars, and more, I'm sure. I was a baking MACHINE!

And it was really fun, frugal, easy, satisfying, and everything tasted SO much better than store bought. It's so great knowing and controlling everything that's going into your baked goods..and scary when you realize how basic everything should be and all the junk added to everything in the stores!


But with a toddler running around now, baking just seems incredibly daunting.


I know I need to just jump back into it. I do miss the satisfaction of it. And I would really love to have homemade healthy snacks for my daughter.

So I decided to start doing "Baking Days" again. By dedicating a few hours once or twice a month, I can store extras in the freezer and get the mess over with all at once.  Plus, it really helps to start with a plan in place.

If you've never baked from scratch before, I'd highly recommend giving it a try, even just starting with one recipe. I started off making bread and dough with my bread maker but lately make just about everything using the dough attachment for my Kitchen Aid mixer (which I LOVE..thank you Aunt Linda!!).

I thought I'd list my baking day plan here on the blog, so you all can keep me accountable! My husband is deploying with the Air Force the beginning of December. I'm trying to fit in as much Christmas before then, so I'll get started on Christmas cookies. I also have some pumpkin to use up before it's out of season.

I'm going to try out some new recipes for "healthier" cookies and snacks...made without or with limited refined sugar and flour. I will update you with how everything turns out!


Here are the recipes I'm planning on making (baby permitting!):
Chocolate Butterhorns (like chocolate croissants..AMAZING!)
My all time favorite "Snow Ball" Christmas cookies
Itty bitty carrot cake cookies
Pumpkin pie banana chunk oatmeal cookies
Wedded Bliss Soft Ginger Cookies
Pumpkin butter oat squares


Non-Baking items:
maple-cinnamon-almond-butter-with-hemp-flax-and-chia-seed
And do something with the beautiful head of cauliflower I got at the farm stand and has just been sitting in my fridge.


You'll notice most of the recipes come from a vegan blog. When looking for "healthified" recipes, I've found vegan recipes are a good place to start (like my yummy vegan Pumpkin Bread Recipe). Sometimes I un-veganize them though, depending what I have on hand (ie. butter and eggs).


A little over ambitious, I know. I just got a little excited about getting back into it. Rule #1 though, I don't stress about what I don't get done.  I'll probably give myself several days to get as much done as possible. I'll let you know soon how it goes!

Sunday, November 20, 2011

Free $5 Check from Magazines.com (Facebook Offer)

Sorry this blog is turning into a deal site, like with this ebates post, but it's something I'm super obsessed with passionate about and thought I'd share some of my favorite deals. The only thing that brings me more bliss than a good deal is passing it on to others!

This one was especially good and easy to do: Not sure how long this will last, or if it will really go through, but I just saw this post on MoneySavingMom.com for a super easy $5. Check out the details here. And check out the rest of the site while you're there. It's literally changed my life!

Saturday, November 19, 2011

DIY Dining Room Table Top and Ebonizing Stain (Steel Wool and Vinegar)

I mentioned in this post that we were refinishing some old furniture for our dining room. My husband has been bugging me to post an update about his progress and hard work, so here it is!


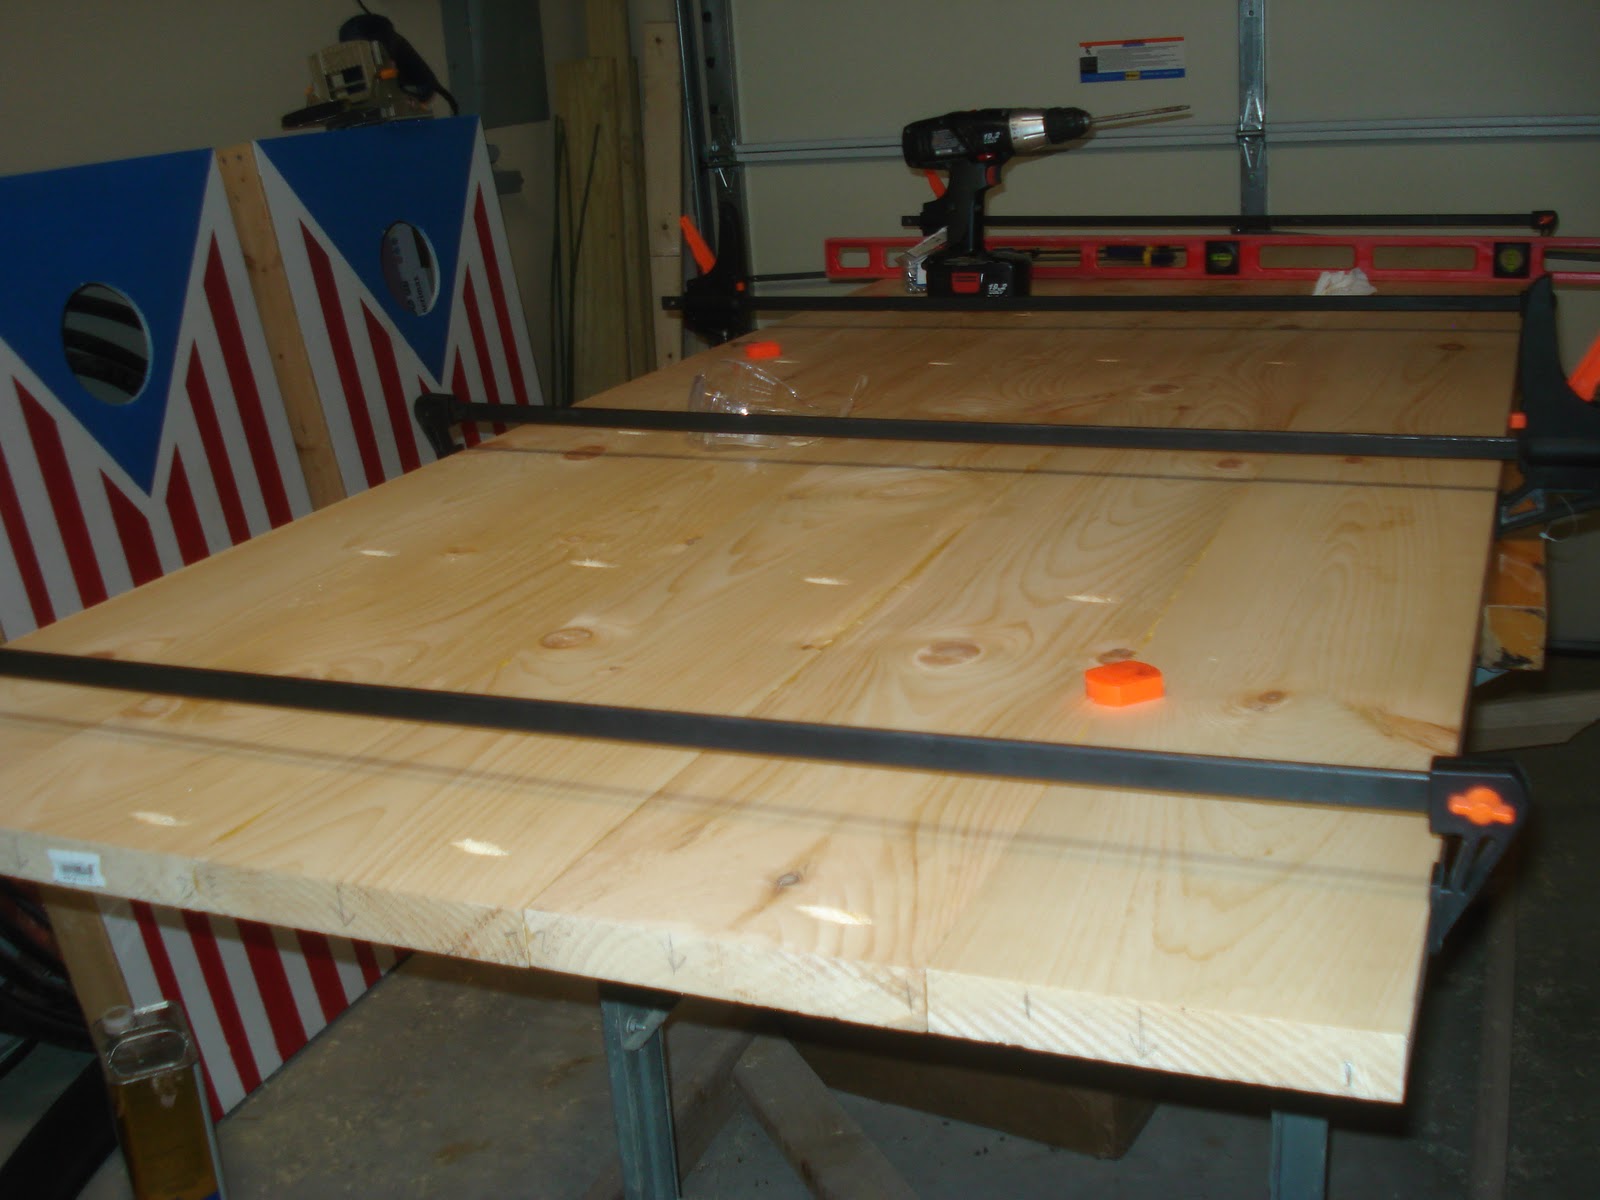
He started off with some oak wood planks from Home Depot. We liked the knotty, grainy look of the oak. They only cost around $50.


For the wood planks he drilled slits in the side of the planks and joined them all together with these biscuits, wood glue, and screws.


And stuck in these wood joining biscuits with wood glue. He explained that the biscuits are made of compressed sawdust that will expand in the slots. He cut the slots with a biscuit joiner tool.


Then he clamped it all together with these big wood clamps and let the glue dry.


To make it extra secure, he put in some screws between the pieces on the bottom. Like the abnormally fast and focused worker he is, this all took him a half day. (checked with my husband, they are called pocket screws).


Then he took this sharp razor-y tool and smoothed the entire thing down by hand, taking off these tiny shavings. I'm sure there's a more technical name for all this. I'll have to ask him and get back to you on that.
(Ok, I asked, it's called a hand plane. It's a Stanley #6, if that means anything to anyone. He said they are really expensive new and don't work very well.. instead find an antique one on ebay like he did and sharpen the blade. They just don't make hand planes like they used to I guess :)


THEN....the best part!

He had asked me the day before how I wanted to finish the wood. He said he could just seal it as is, but I hate the look of raw wood. He said he could stain it, but I don't love that look either.

What I really love, from the bottom of my heart, is the look of this wood from Restoration Hardware:

                 
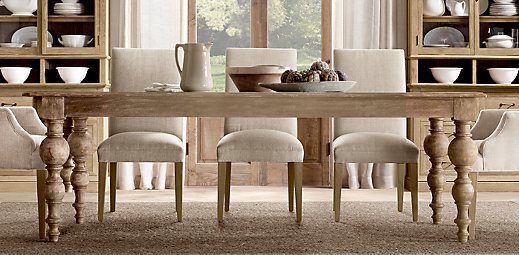
I love the aged look of tables like this.

However, I do not love the thousand dollar price tag!


Fortunately, while blog surfing a few months ago, I came across this post on staining wood with steel wool and vinegar. Sounded kind of crazy, but I loved the look, which reminded me of the Restoration Hardware table.

So I told my husband I wanted to stain the table with vinegar...and he looked at me like I had finally completely lost my mind.


But being the wonderful husband that he is, he did some research about it on his own. He liked what he saw and decided to give it a try. Of course he took it to the next level and learned more about it than me. The stain process is called Ebonizing. The iron in the steel wool reacts with the tannins in the wood, to create that aged look. It stains the fibers of the wood instead of just sitting on top like regular stains, so it's really durable. You need to use a wood with a high tannic acid content, which oak has, so we got lucky since that's what we already had picked out.

To make the stain, you soak pads of steel wool in vinegar, for at least overnight up to a week or so. More rust equals darker stain. Since we had a Thanksgiving dinner to serve to my family the next day and no table, we just went with an overnight soak. I read from some sources that apple cidar vinegar is best, but distilled white vinegar is fine and what we used (I use white vinegar as a fabric softener for my laundry and to destink my cloth diapers so always have a lot on hand...in case you ever wondered who it is that buys those giant jugs of white vinegar, it's me). You can also add a rusty nail to the mix, but we didn't.

My husband also read about using brewed tea as a stain, so he decided to give that a try too. The tea has a high tannic acid content it adds to the wood. He did some test pieces ahead of time with various combinations of the tea and vinegar stain. We liked the look of a coat of tea followed by the vinegar. He did one coat of tea followed by 2 coats of vinegar.


So here are the stains. From everything I read, it's best to do the steel wool/vinegar reaction in a glass jar. We used an empty applesauce jar from the recycling bin here. You can see the test stains on the wood at the bottom of the picture. The tea gave it a redder look, which we like. He used English breakfast tea, not sure if that matters. Probably a black tea is best.


Now, here's the thing. The stain takes awhile to develop. My husband said he put on the coats of stain...and then stood there like an idiot holding vinegar in one hand and tea in the other...with a wood table top that look exactly the same! Luckily, before he went inside to scold me for a stupid idea, he went and cut the grass.

By the time he came back the table had started to darken. He ran in the house, shouting like a kid on Christmas morning..."Honey!! Drop everything and come look at the table!!!!" So I ran out..and it really was like Christmas morning. I had my dream table finally!!!


So this is the stain reaction a few hours after application, while it was still drying and processing. But already looked great! We brought it in the house and it continued to darken for the next few days. Heat seemed to speed up the process. Pretty cool!! We LOVE it.! The tea gave it a red tint, almost a purple in some spots. To get a darker stain, you'd need to let the steel wool sit longer in the vinegar, but we didn't want it too dark.


Brian painted the frame from the old table and screwed it in the old. The new table is a lot bigger, so there is some space. He said he may eventually make a drawer to put in there or something, but I can live with it like this for now.


And for the legs, he painted them using the same technique as the dining room antique dresser, with a coat of white paint followed by finishing glaze rubbed on and wiped off.


The table is currently in the garage with the finishing seal drying. I can't wait to show you the finished product soon!!! :)

Friday, November 18, 2011

Ebates: Money back for online shopping!


You know I love a good deal! I'm starting my holiday shopping, which I mostly do online, and wanted to make sure I mention about Ebates in case you didn't already know.


I love it. You just sign up for free and they have thousands of stores with a percentage listed. That's the percent you get back on whatever online purchase you make from that store. All you have to do is click on the store's link through Ebates, place your order like normal, and you'll get that percentage back as a check from Ebates 4 times a year.

And even better...just for signing up now, you get a $10 gift card bonus to either Barnes and Noble, Home Depot, or Target! I love nothing more than holiday shopping with free money! :)

I usually get a check around $5-$10, which isn't a fortune, but great for free money on things you would have purchased anyways! Always check the site before you place an online order. They usually also have listed any current promotions too, like codes for free shipping or percentages off your order when they are available, saving you even more.

Speaking of...always check for promo codes at sites like retailmenot.com before you make any online orders. I'm amazed at deals I'll find. I just saved $25 at Shutterfly yesterday that I would have missed otherwise with promo codes there!)

Here are the cash back deals at Ebates for some popular stores right now:
Walmart 2%
Target 3%
Macy's 5%
Barnes and Noble 8%
Groupon 3%
JCPenney 3%
Nordstrom 5%
Shutterfly 8%
Crate and Barrel 3%
Overstock.com 3%
Kohls 4%
Babies/Toys R Us 1%

I've been doing it for years with no problems. Your check will be sent automatically 4 times a year.  Happy Shopping!

Also, don't forget to sign up for DailyFeats.com. I've already gotten a $10 ebay gift certificate and $10 Toys R Us gift card for free!

Wednesday, November 16, 2011

I Heart Thanksgiving!

One of my favorite things about Thanksgiving are the fun tablescapes! As a kid, I was always the one to decorate the family Thanksgiving table. I loved digging through Mom's box of Thanksgiving decorations and coming up with a fun, clever way to set the dinner table each year.

One of my weird things I like to do around Thanksgiving is to spend some time looking at different Thanksgiving table settings I find online. More so then any other holiday, Thanksgiving just seems to have the most important table decorations in my eyes. Probably because the food is the main event at Thanksgiving and you want the table to look like the star of the show!

I always like the tables that are a bit over the top, flooded with candles, pumpkins, fabrics, and fall decor. Sure, it doesn't leave any room for the food, but that can be figured out later.

Here are some of my favorites from the HGTV website.


I loved this one! I really like all the dark fall colors, the ribbons, the mis-matching of candle sticks, and the small vase of roses in the center. Roses for Thanksgiving, who woulda thought?


This one I just LOVED the dishes. And that's all I have to say about that...


Now this one seems like something I could manage! I love the center filled with gourds, pinecones, and tea-lights. Simple and easy yet very Thanksgiving-ish.


This table setting caught my eye because of the rustic feel. Outdoorsy/rustic/natural seems to work so well with Thanksgiving. And I love those pumpkins sitting on the candle holders! What a great idea.


I put this one on here because of the candle holder placed up on a couple of old books. Love it! It is a really great unique way to get different heights in the tablescape. I don't know if it's something I would do for Thanksgiving, but something I think I will keep in my back pocket.


Okay last one. I just liked this one. It caught me eye. I really like the ribbon tied around the wine glass. I'm going to use that one at Christmas! A great way to add some color to the table.


Since Thanksgiving is just around the corner, I thought I would end this post with a few things I love most about Thanksgiving...


*The smells!

*Waking up to the Thanksgiving Day Parade.

*Getting to listen to Christmas music for the first time (yes I always try my hardest to hold off on Christmas until Thanksgiving).

*Getting to eat amazing decadent food all day and not feeling the least bit guilty about it, because it's Thanksgiving and that is what you are suppose to do!

*Candles lit and a fire roaring in the fireplace.

*Getting all dressed up in my Thanksgiving day outfit.

*Nursing a great glass of wine as I cook.

*Having family in the kitchen all helping to prepare the feast.

*Setting the dinning room table with a beautiful Thanksgiving theme.

*The kitchen table set up with yummy appetizers that you definitely don't need to eat but so enjoy anyway.

*After dinner coffee and pie!

*Getting my jammies on after dinner and sitting around doing a puzzle and watching a Christmas movie.

*All the nostalgia and childhood memories the holiday brings.

Refinished Furniture: Dining Room Buffet and Table

We've been so busy with home projects around here lately! So excited about all the progress and wanted to share.

I've had this old dresser that was left behind in one of my father-in-law's apartments that I've been holding on to for years. The paint was chipped and covered in dirt and God knows what else. It stunk so bad that we couldn't bring it in the house, so it's been sitting on the front porch  at our old house (I miss that front porch so much!) and in the garage since we moved here.


The thing is, I really like the color and aged look of it and didn't want to change that by just repainting it. So I was thrilled when I came across a technique for keeping that look.

Well, it's refinished and now the centerpiece of our dining room!


Still looks like an antique dresser though, right?? I KNOW!! That's the best part!! I'm SOOO excited about how it turned out. It was a true combined effort on the part of my husband and me. My vision (that he thought was crazy at first!), his work. 

He sanded the whole thing down (and came across a date..1904!!), and put on a couple of coats of white primer. (I'm not allowed to detail paint like that...I have zero follow through to finish big projects and don't have the patience for all the prep work. I would have just thrown on a coat of paint over the old stuff and called it good, ruining the piece in the process. Used to drive my husband crazy, but we've found away to work around it :)

After the primer, he put on 2 coats of some white paint we already had. It's the same paint that I used for the baseboards in the dining room, so the dresser actually started off the same color as the white wall behind it.

THEN..the best part...he just took some Finisher's Glaze in Van Dyke Brown (NOT regular stain, like I orginally thought) and rubbed it on, then rubbed it off, leaving behind a film that gives it that aged look and darkens all the edges.

Stains & Color Products

And here's the finished product:


I. LOVE. IT. I was going to get new hardware, but my husband soaked and scrubbed the original brass ones and I love how they turned out. So we just have to install those and will be all set.

I've been really anxious to finish decorating the dining room. It's been the bane of my existence since we moved in. I almost just went out and bought a whole set from Pottery Barn. But I'm SO glad I waited. I've come to realize that you just can't get that personalized, home-y feel from mass produced furniture.

So we have a dresser/buffet for the dining room...but no table and chairs. We've had an old set in there that my husband bought at a garage sale for our 1st apartment 5 years or so ago for $50.  I've hated it from the moment I saw it and have ever since..but have had to live with it since then because we didn't have the money for something new..and when we did, I couldn't find anything I liked. I spent a ton of time online trying to figure out what I wanted.  I did this Dining Room Inspiration post, way back in April..with no progress since then.

Until I wandered into a Pottery Barn one day and spotted this right up front:

Alternate View
(source: Pottery Barn)

I absolutely fell in love with this distressed, white table. Who would have ever thought to use that for a dining room?? Not me! Definitely not my husband..it was a hard sell. But the idea of not spending thousands on a new set was a huge deciding factor. I really fell in love with the idea of not doing the traditional formal dining room, and giving it more of a cozy, cottage-y feel like this:

Okay..a little extreme, but you get the idea. I really wanted to dining room that felt like you would just want to hang out in there all the time, not just a few times a year for formal dinners.

After finding my inspiration pieces I realized...hmm, I really like the legs of the old table. They kind of had that same feel. But the top of the table was SO gross...a fake wood-grain veneer. My husband said he could make a new top so I thought we'd give it a shot.
Here are the legs before:
Kind of a neat shape, yes? 

Here's the first coat of white paint before the finishing glaze.

Here's the old top. Plastic "wood"...gross.

And here's the future new top. Wood planks picked up at Home Depot. I think it was around $50. We're doing a special finish on it, I'll share once it's done. I'll also show you a little of how he put it together

My husband and I are both so excited about how everything is coming together. I learned so much from reading decorating blogs through the years on refinishing furniture. I would NEVER have thought to do that on my own. The biggest thing is to find a good quality piece (ie. real wood) that you like the shape of, then figure out how you want to refinish it. Check out craigslist for great deals or thrift stores...or just look around your house! There are a ton of How To refinish/paint furniture video's on YouTube.

We can't wait to see how it all comes together. I'll share the finished project, hopefully soon.

Tuesday, November 8, 2011

Lovely November Morning

When it's a beautiful Fall day you really have to stop and take time to just enjoy it... especially when it's November and the long winter months are only days away. This morning was absolutely gorgeous. I mean, like the most perfect fall morning you can imagine. The air and sun felt so amazing we just had to go out and take a walk.

Immanuel made coffee this morning, and for some reason it was really bad... bless his heart, haha. But really I'm pretty sure it was the "to go" cups they were put in that gave it a weird taste. But this coffee was un-drinkable so we decided to walk up to this coffee shop that is literally around the corner. It's one of those places that we drive by constantly and always say "we should walk up there some day" but haven't. So the bad coffee this morning gave us an excuse to go there :)

It's amazing how just doing something a little different in your day can be so liberating. We just sat outside for a little bit enjoying the beautiful day, talking, and enjoying our tasty cup of coffee. We absolutely love living in Lakewood having so much in walking distance. There's just something about walking to a place that makes it so much more special than driving there.

 With a morning like this you can't NOT have a great day!


DIY Thanksgiving and Fall Decor on a Budget

As my sister Brittany and I were discussing, we don't have a lot of extra money for decorations, as I'm sure most people don't nowadays. Homemade decorations are such a great way to make your home festive on a budget. Not to mention the personal satisfaction that comes with making something and displaying it in your home. SO beats any store bought decor.

I was so excited that Brittany found inspiration from my post on DIY Halloween decorations, by creating these adorable light up jack-o-lanterns. So I thought I'd share some more inspiration for DIY Fall and Thanksgiving decorations.


Here are some of my favorites:
          
I have a love affair with DIY wreaths, like my Valentine's wreath here, and my Spring wreath here.  It's been a great way for me to break into crafting. You can find some great Fall wreath inspiration at my new favorite craft site, U-Create. You can buy plain wreaths and wreath forms for cheap at any craft store and add anything to them. LOVE the look of the burlap here.

linda fall wreath


I love this "Count Your Blessings" jar. You could use any container you already have, anything to fill it, and just make your own cute little sign.


I love the idea for a "thanks board" and it looks pretty easy. I really want to work on bringing a more personalized touch to the home to surround me with more family pictures and things with meaning.

I was thinking you could also do one with your last name and hang family pictures below. You could buy pre-made wooden letters from Michael's or Joann's or just make your own templates and cut them out from scrapbook paper.


Here you can find a tutorial and free templates for this adorable Fall banner, just need some felt, which runs pretty cheap.


I love this "be thankful" board also:
                                          
You could do this with a phrase for any holiday. You could also make it on a piece of paper instead of the board and use a frame you already have (or get one at the dollar store).


And the Graphics Fairy is an awesome site with tons of free images. I love the vintage-y look!
                                           [turkeyboy001.jpg]
                                          (Something about this picture totally cracks me up! :)


I love ideas like this wheat basket that are so simple, but my very uncrafty mind would never think of on my own. Just find a basket or any container (look around the house, you may already have one), and add a ribbon and some wheat or other Fall looking fillers from a craft store.

Here's another take on the wheat that I love:

fall jars tutorial

I think a trip to the craft store to stock up on some wheat stalks is in my near future.

Let me know if you make any of these or have found any other fun craft ideas to share!